bridges (18) campsite (28) cartoons (15) centenary (3) discussion (5) experimental (51) gadgets (23) gateways (12) lashings (21) models (9) raft (84) resources (27) sculpture (16) software (22) techniques (42) towers (45) trebuchets (5) treehouses (17) tutorial (9)

February 27, 2006

Anchors and Anchoring points


As part of the lead-up to Kontiki, I'll be posting a few tips about building rafts. View all of my raft tips and designs here.

If you are taking a raft out on the water and you are untethered (ie. not tied to the shore) you will need one, preferably two good anchors. Anchor ropes should be long enough (3 times the depth of the water is a good rule of thumb) and in good condition, and tied securely to both the anchor and the raft. An anchor bend is designed for this purpose.

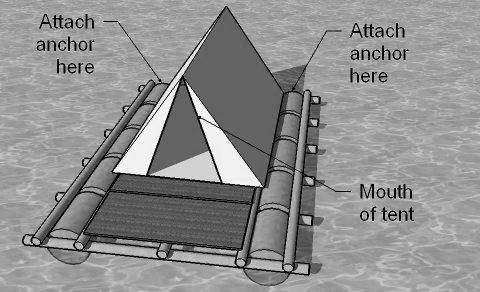
The drawing above illustrates a piece of advice that we discovered the hard way: when you place your anchors, make sure that the mouth of your tent point away from your anchorage points. Here's why: once you cast anchor, if the wind blows, your raft will turn to face anchors-first into the wind. If there is precipitation (superstition prevents me from saying the R-word in connection with Kontiki) then it will come flowing straight into your tent if the door is facing the same way as the anchors. Our troop discovered this during a particularly powerful storm uh, weather event in 1996 where our open-ended shelter turned into a water gathering funnel because of badly placed anchors.

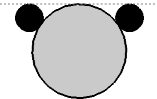
As for the actual anchors- if you can get the real thing, then great: a folding grapnel anchor or two do a really good job here. If you're not a Sea Scout, then don't worry about such things: click on the image on the left for instructions for making a 'Kontiki pattern' anchor. This drawing is courtesy of the Gauteng Kontiki page, where it was hosted until recently, and I'm posting it here for anyone who needs a solid, easy-to-make raft anchor.

Next I'll be looking at how you can move your raft around: oars, paddlewheels, punting and sails.

February 16, 2006

Three Measurements for rafts


As part of the lead-up to Kontiki, I'll be posting a few tips about building rafts. View all of my raft tips and designs here.

Experience has shown me that the most common mistake in building a raft is in bad measurement- and these are the 3 'show-stopper' measurements- your raft will not be successful if these are wrong.

1: Barrel height.
In the kind of raft I have drawn here,you need to make sure there is enough space between lateral poles (poles running left-to-right) on your raft for the barrels to fit in. Remember to allow space for lashings as well - make sure the front-to-back space between lateral poles is the height of the barrel plus the parts of the two square lashings in front of and behind it.

2: Space for barrel. THIS IS NOT THE BARREL WIDTH. If it is , your barrels will pop through the top of the raft. As a general rule, the widest you would make this with steel drums is to have a point where the top of the barrel is level with the top of the two poles that it is supporting it, like the drawing on the left. When using plastic drums, this space must be much narrower (I have seen plastic barrels pop through surprisingly narrow gaps on more than one occasion). You also don't want this much narrower then around 30cm/12 inches- too narrow and the barrels tend to slip sideways, regardless of how tightly they are tied in. Obviously, when using a technique like Camel, this dimension does not exist (but in Camel the idea of rope tension is important- the binding ropes circling the two barrels need to be slightly loose).

3: Distance between decking supports. Another relatively simple measurement, but one that is easily forgotten when laying a raft out. Whether you are using plywood, cargo pallets, planks, or poles for your deck, make sure that your decking is supported properly and doesn't fall short of the supports on one side.

Over the next couple of days, I'll put up some tips about moving your raft on the water, placing anchors and anything else I get requests for.

KONTIKI

Kontiki is one of two annual scouting events in South Africa- the Gauteng provincial event is the biggest annual scouting event in the country.

Kontiki takes it's name from Thor Heyerdahl's 1947 expedition to sail from South America to Polynesia to prove that it was possible for Polynesia to be colonized from the East, rather than from the North via Asia as most people thought (and still think). Read the book or watch the DVD to find out more.

If you are thinking of building a raft with your scouts, the Cape Western and Gauteng Kontiki websites have quite a few tips for you (you will need to sign in to the Gauteng site to download the booklet, but it's worth a few minutes spent filling in the form). I'll be posting more about rafts in the next couple of weeks, including some conventional and also rather unconventional raft designs and some tips for designing your own.

February 13, 2006

SA Blog awards

Nominations are open (until Friday) for the South African Blog Awards. If you know any South African blogs you enjoy, head over and nominate them here (completely unconnected of course- I suppose Ropes and Poles is a new blog, and also incidentally a lifestyle blog)

Pioneering by non-Scouts...


This last weekend, first year architecture students from Wits university built shelters that they had to sleep in for the weekend. There were one or two scouts involved (some rather tidy square lashings were in evidence) but quite a few people doing this for the first time. Take a look at my Architecture blog for some photos of the construction- and to read a bit more about the weather we had this weekend.

February 4, 2006

Lightweight Racing Raft


This lightweight "outrigger" style raft was an idea I had to reduce the weight so that the raft could travel faster. All of the decisions made in the design were to reduce the weight as much as possible. Compared to the raft design our troop normally uses, which is similar to this pontoon ferry, about 50% of the poles are used, so in theory at least the bouyancy is increased (because the same number of barrels are used). Note also in the central row of barrels how bindings are used between barrels, rather than poles. This saves weight further (if you omit the bindings and try to make do with nothing joining the two parallel poles together, you get barrels that froce them apart and pop through between them)

The paddlewheels, designed by Gregory and Graham Witt, are made by brazing (not welding, unless you want holes in your barrels) brackets onto oil drums and attaching plywood paddles to them. A steel sleeve is placed through the centre of the barrel through which a greased axle passes.

Note the two ropes that extend to the fron of the raft from the two edges of the deck: they are used to tension up the structure and give it some rigidity. One end is anchored with a round turn and two half hitches, while the other end is secured using a Trucker's hitch to allow the rope to be tightened.

As far as speed, I'll leave it to you to figure out whether this raft works out faster: do you think the weight we saved is enough to counteract the fact that we now have 3 barrels providing resistance? I must be honest and say that it wasn't noticeably faster or slower than our normal raft, so this is still an open question.

Of course first prize in terms of drag would be a single line of barrels, but I can't see a way of balancing a raft like that. I am open to suggestions though...