
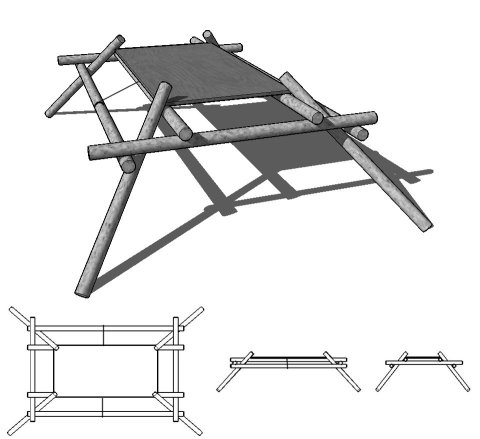
 More reporting from Kontiki- Marc spotted this table at Kontiki, which has been built quite ingeniously. Friction locks the whole table together. There is one rope stopping the entire thing from spreading out and falling apart, running across the table (from left to right,under the table top). No lashings are used at all in this construction.
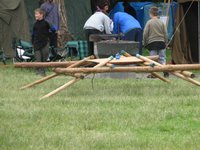 The original table was made (I think) by 1st Greenside scout troop- if you can confirm this or correct it, please leave a comment for me here. From the photo, I am unable to tell whether the legs are splayed out or parallel to each other, in the drawings above I have made them splayed so that they lock the table-top down.
 I imagine that it would be built like this: lay out 4 parallel poles (the ones pointing towards the screen in the drawing and photograph) and tie together (with clove hitches on each pole).
Lift the 2 centre poles you have just tied, place the two cross-poles under these but over the outside poles.
Place table top in centre of table.
Lift table (by the two outside tied poles) and hold up (2 scouts) while the legs are inserted.
Once again, I'd love to hear from the builders of this table, and know how they actually did it.
12 comments:
the original design is supposed to be a friction bridge, just that they reduced the size and made it a table.
where can i find\get this kind of sketching program?
it looks so real, and it will be helpfool for me!
I use a package called SketchUp for my drawings, more information is here
how do u make the poles?
how do you make a pole shape?
does anybody have the design for the bridge version of this table?
Here are two: (both from Hurricane District Pioneering site) - Michael Kaufmann's and Troop 4's
We used the building of the friction bridge at Somerset County Jamboree as a scounting skills activity. The scouts loved it, probably because they didn't have to do any lashings :(
Very nice - I am completely convinced that our scouts will love the construction :)
I've taken a note of your floating campfire, too!
Best regards, Ole
Ravnehus Group, the Danish Scouting Association (sorry - website in Danish only but gave the link anyway).
TI see why they call this a friction table (as opposed to interlocking). The pieces are free to slide (the worst are the 2 supports for the table top, they can easily slide to the center.
This was quite hard to build. Actaully very easy to construct as designed, but the friction is tough to come by. I built a sample out of PVC pipe. Maybe that was too slippery. It pretty much always slid and collapsed. I tied simple clover hitch knots to keep the 4 parallel poles the correct distance appart with a rope accross each end. I also put a loop around the 2 end supports, just because that was easy. With those 2 ropes, the center rope is not needed. This is not nearly as elegant as original design, but it did stand up. I would not say it was sturdy enough for a real table, though. All 4 legs need to be in perfect position and if they slip at all (or the table twists), then it will still collapse. I am not sure anyone here has really built one? If not then looking at the photo makes it look sturdy, but I question if it can be made to be useful for anything other than a nice looking item.
Maybe using rough wood would be better? But, I believe the ropes I used overcome most friction issues did that and it is still not sturdy. It is also pretty low (as also seen in the photo).
Hi,
Using wood does help the friction a lot. The ones I have seen (two built in this design,and several in the similar mini bridge), use gum poles, which have a rough surface. Combined with soft, grassy ground, this provides enough friction to hold the table together.
I have build similair one for years, and it is easy, it takes 5 minutes for 1 table with 2 persons.
Only i connect the the parallel poles with loops of 1 meter length made from sisal.
after one week they can be removed because the wood has set onto each other.
And i use 2 more poles instead of the tabletop.
The only worry is the thickness of the legs, they have to be strong for the momentum they take.
for the surface to stand on, harder and smoother is better, it lets the legs set to the best angle.
Post a Comment