
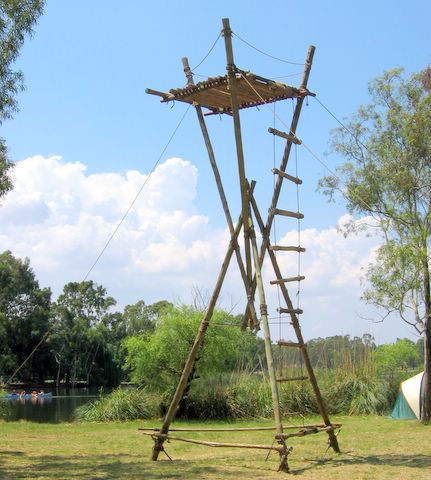
The Hourglass Tower is something of a classic for scout pioneering. John Sweet's excellent Scout Pioneering book describes it, and since then many scout troops have built one. The one photographed above was built by our Girl troop as a Springbok construction at JOTI/JOTA last year (I chose this mast to build as a partner for this tower). This is the second hourglass tower I have been involved in building- the last one was some 10 years ago, when my Patrol Leader built one for HIS Springbok construction. The two towers were if similar size, but were put up in different ways. I'll describe both ways and also a few thoughts on each.
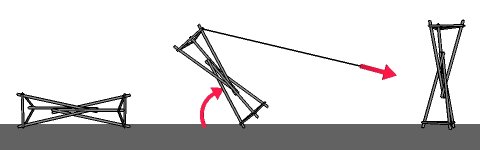
Method 1: This seems to be the method John Sweet favours (although the book is a little vague) and was the one used for the tower pictured above. The tower is built and lashed together while lying on it's side, and then raised up into position, in our case using a block and tackle with a pulley attached to a tree to pull the tower sideways and slightly upwards.
Pros:
- Entire tower can be carefully measured while it is being built.
- Once the tower is erected, it is immediately stable.
- Labour- it took around 25 people to get this tower up
- The tower was also placed under a lot of stress during the process, which distorted the shape slightly.
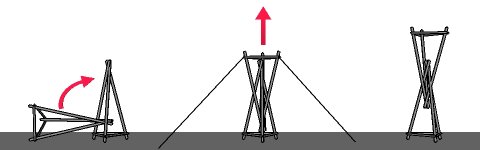 Method 2: As far as I remember, my Patrol Leader came up with this method as the easiest way to get tower up with the labour he had (our troop at the time consisted of 7 scouts). The base tripod is placed and staked down, the upper one is then fitted into it, before being propped in place, still on the ground. Then a block and tackle is attached to the top of each tripod (ie. thee part where the three poles meet) and used to raise the upper tripod up. Guy lines are used to hold the upper tripod in place while the 3 lashings are tied that join the tripods together.
Pros:
- Needs less labour (7 scouts vs 25)
- Lashings are not subjected to any twisting after they are tied, which is a problem with method 1
Cons:
- While the lashings are being tied and the tower is supported by guyropes and the pulley, it is pretty unstable (actually, we did drop the top tripod, narrowly missing one of the Scouter's cars. hmm... maybe that's why he left...)
- It can be difficult to level the tower accurately
2 comments:
How about adding videos to you page?
Check this real version of your hour glass tower --
http://www.youtube.com/watch?v=3_GoH2bgN2I
Thanks,
Brian
Crew 272 Advisor
Very cool! I helped build one with my scout troop back around 1981. I recently made a small model sized one with dowels and nylon cord.
inverted tripod/hourglass model tower
Post a Comment