bridges (18) campsite (28) cartoons (15) centenary (3) discussion (5) experimental (51) gadgets (23) gateways (12) lashings (21) models (9) raft (84) resources (27) sculpture (16) software (22) techniques (42) towers (45) trebuchets (5) treehouses (17) tutorial (9)

May 27, 2006

Erecting an Hourglass Tower


The Hourglass Tower is something of a classic for scout pioneering. John Sweet's excellent Scout Pioneering book describes it, and since then many scout troops have built one. The one photographed above was built by our Girl troop as a Springbok construction at JOTI/JOTA last year (I chose this mast to build as a partner for this tower). This is the second hourglass tower I have been involved in building- the last one was some 10 years ago, when my Patrol Leader built one for HIS Springbok construction. The two towers were if similar size, but were put up in different ways. I'll describe both ways and also a few thoughts on each.


Method 1: This seems to be the method John Sweet favours (although the book is a little vague) and was the one used for the tower pictured above. The tower is built and lashed together while lying on it's side, and then raised up into position, in our case using a block and tackle with a pulley attached to a tree to pull the tower sideways and slightly upwards.

Pros:
  • Entire tower can be carefully measured while it is being built.
  • Once the tower is erected, it is immediately stable.
Cons:
  • Labour- it took around 25 people to get this tower up
  • The tower was also placed under a lot of stress during the process, which distorted the shape slightly.
Method 2: As far as I remember, my Patrol Leader came up with this method as the easiest way to get tower up with the labour he had (our troop at the time consisted of 7 scouts). The base tripod is placed and staked down, the upper one is then fitted into it, before being propped in place, still on the ground. Then a block and tackle is attached to the top of each tripod (ie. thee part where the three poles meet) and used to raise the upper tripod up. Guy lines are used to hold the upper tripod in place while the 3 lashings are tied that join the tripods together.

Pros:
  • Needs less labour (7 scouts vs 25)
  • Lashings are not subjected to any twisting after they are tied, which is a problem with method 1

Cons:
  • While the lashings are being tied and the tower is supported by guyropes and the pulley, it is pretty unstable (actually, we did drop the top tripod, narrowly missing one of the Scouter's cars. hmm... maybe that's why he left...)
  • It can be difficult to level the tower accurately
All in all, 2 methods that both work, with good and bad points for each. I would use the first method when there are many scouts to help you get it standing up, and the second method when there are fewer scouts, or on open ground when there is no tree to help raise the tower upwards.

May 22, 2006

'Pencil' raft- lighweight racing raft.


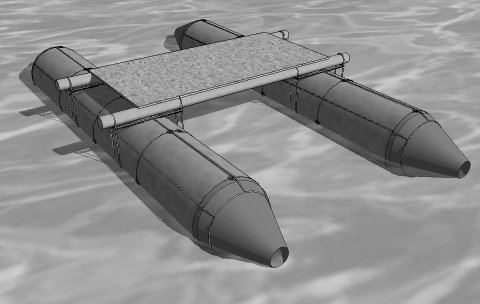
Kontiki Chairman's Challenge 2005 produced an experimental raft from our boy troop, as well as this raft from our girl troop. Extremely lightweight, this raft was pretty fast, and in fact won a sprint race. Using only 2 pioneering poles and 1 decking sheet, this is not the most comfortable raft for a long-term expedition. I have drawn it with the shelter and paddlewheels (one in front of and one behind the deck) removed to show the structure more clearly. The raft is named after the 2 groups of barrels, which have 'sharpened' ends, built with fibreglass cones that were specially made for the raft. These pencil tips at the front and the back are the anchoring points for six ropes that run from the front to the back, clamping the barrels together and holding them as one unit. The pencil concept was originally used on a full-size Kontiki raft and all of the components were made by the Beneke family.

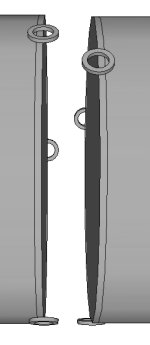
The barrels connect to each other because of lugs that are attached around the rim of the barrel. These need to be attached very carefully- preferably by brazing and not welding. Try and find someone who knows their work to do this for you. We have had trouble with leaks around these lugs- the barrels are made of very thin metal and the heat needed to attach the lugs damaged the rubber seal. This is just about the lightest large oil drum raft I can imagine- there is very little weight wasted on structure. But the advantages of increased streamlining and reduced structural weight come at a cost-there is a good chance one or two will leak, so you might want to make some extra. Try this out if you have barrels to spare, but not if they are the only set you have to build a raft with.

May 15, 2006

Small camp table


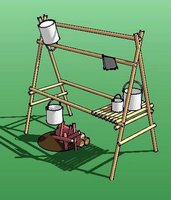
This table was built by one of our patrols (Eagles) as a kitchen prep table. All timber was freshly cut invasive vegetation from the campsite. Although all of the poles were very light, the table nevertheless comfortably supported my (not insubstantial) weight. A quick, simple table, we have since used the design for several camps and outings.

Update: At around the same time I published this post, Clarke at Scoutmaster blog hit the button on his computer and published drawings of this Kitchen Table.

May 6, 2006

Tangaroa- Pacific raft expedition in the footsteps of Thor Heyerdahl


Here is one especially for raft-builders: Tangaroa is a raft expedition, following the route of Thor Heyerdahl's famous Kon-tiki raft that sailed from Peru to Polynesia in 1947. Heyerdahl's grandson is part of this expedition, and the raft got underway on the 28th of April - 59 years to the day after Kon-tiki did.

Here is some information on the Tongaroa (if my Norwegian can be trusted):

11 Balsa base poles
7 longitudinal poles
16m long
8m wide
Height of shelter: 1.5m (not sure I translated this right)
Mast: 13m high
Sail area: 60 sq.m
Centreboards (guaras): 9 x 4m long boards

From the photos, it looks to be built with traditional manila/hemp rope, like Kon-tiki was. In principal, the skills used to build this raft are skills that most scouts have (not too many scouts have 16m long balsa trunks lying around though)

You can buy the book or the DVD of the original Kon-tiki Expedition at Amazon.

Keep track of the latest news reports here and live blog posts from the raft here (BBC news also has some photos of the raft construction here).

May 5, 2006

Sketchup for Scouts 2: Download pioneering components for SketchUp


First, if you haven't heard the good news: SketchUp is now free! If you are using it for fun (ie. not making money out of it) you can now download a free version (19 Mb) at sketchup.google.com - just for PC at the moment but Mac is on the way as well.

The second part of this development from Google is something called the 3d Warehouse, where you can upload and download SketchUp models. Quite a few of my models from this site are up there already for you to download (a small raft, a big raft, a trebuchet and an obstacle course), and I plan on adding more. If you upload your own pioneering projects, tag them with 'scouting' so that they show up in this search.