bridges (18) campsite (28) cartoons (15) centenary (3) discussion (5) experimental (51) gadgets (23) gateways (12) lashings (21) models (9) raft (84) resources (27) sculpture (16) software (22) techniques (42) towers (45) trebuchets (5) treehouses (17) tutorial (9)

January 26, 2006

More Israeli pioneering structures...

This is a follow up on the Giant Pioneered Hedgehog: unfortunately I haven't been able to find out much more about these structures: Dor did tell me that they were built by Tel Aviv Scouts on a 10 day Summer Camp- attended by about 1000 scouts, and that each troop built a project.

Let's take a look at some of these projects:


Starting with the hedgehog again- Here is a photograph of the model, showing some of the detail of the underlying structure. From this page (also showing Garfield, Santa Claus and the Frog Prince)


Frog Prince: if you look inside the Frog's mouth you can see the 'lattice' frame that is holding the structure together- a grid of poles lashed together.


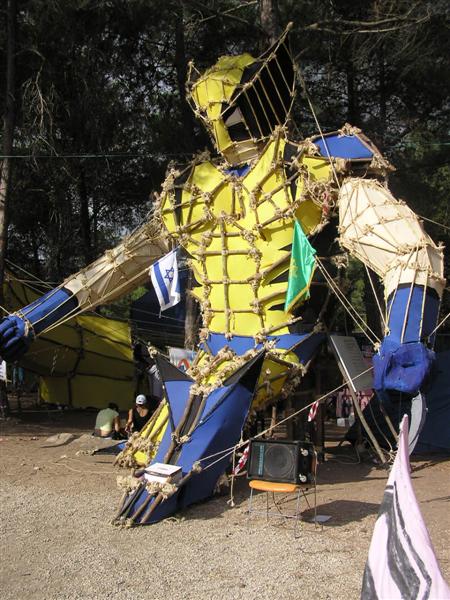
Wolverine: I like how the arms are sticking out, guyed by ropes. The six-pack is also a nice touch.


Dragon: there are a couple of dragons, but I like this one for two reasons: Firstly, the temple that he is flying through is a good addition, and the way the curves of his body are made- if you look just behind his head you will see how the fabric has been left hanging to make a natural bend.


There are quite a few other images at an Israeli scouting website, they're definitely worth taking a look at:
Construction photos (before cladding is added)
Closeups of models, construction process, also a dragon and an eagle completed
Dinosaurs, eagles, a cactus, sportscars and lions
A dragon, Wolverine, Mario and Luigi and a Transformer
Another dragon, Spongebob and Patrick

If you spot anything of interest in the Hebrew text in these links, or if you were on this camp, please let me know a bit more about it- how long did these take to build, who designs them, how many scouts work on them etc.

January 25, 2006

Fantastic Beasts and where to find them


Dor Posner sent me some photos from a summer camp in Israel. I'm waiting to hear back from him with some more information about these constructions, but to get started here's a photo of a pioneered hedgehog- each spine is a quadpod wrapped in fabric and attached to the frame of the animal. Not for the faint of heart, I suppose this took a troop a couple of days to build. But if you want to make your scouts nervous hand them this picture and tell them they have 1 hour to build it...

The Statue of Liberty, the Sphinx, Santa Claus (with reindeer), Garfield and a dragon complete with Chinese temple will follow as soon as I can tell you a little more about how these incredible structures were made.

UPDATE: More info and photos here

(With apologies to Newt Scamander for the title)

January 20, 2006

Camp Wheelbarrow


I set a challenge to my scouts to design a pioneered wheelbarrow during our recent troop camp, and this is the result- Kingfishers patrol built a wheelbarrow complete with wheel cut from a log.

Construction is very simple- 4 thin spars lashed together with square lashings, a "cradle" woven between them, and a wheel with a tent peg axle. Very fast wheelbarrow, still looking solid six months down the line, it now hangs in front of their patrol den.

January 16, 2006

Portcullis Gateway


As you can see, this gateway has a movable gate that is used to open and close it. This gateway was designed by Kudus patrol and tested at our troop camp in June of 2005.

The equipment you will need for this:
2 x 4m poles (lightweight)
3 x 2m/3m laths
2 x long stakes for anchoring upright poles
6 x lashing ropes for frame
2 x sash pulleys/ keyrings / carabiners
sisal
nylon lacing cord

We are building a simple gateway, suitable for a patrol in camp or possibly for a troop on a weekend camp. What makes this gateway unusual is the mechanism for opening and closing the gate, which rises straight up like a portcullis in a castle.

The outer frame is made first, by square lashing the crossbar onto the two vertical spars. Once those 2 lashings are tied, lie the gate down where you want to place it, and hammer the stakes vertically in at the base of each pole- if you do it this way, you know you will have the right spacing for your stakes. While the stakes are being hammered in, you can work on attaching the gate to the gateway.

The gate is made by tying one lath under the other, using short pieces of sisal (if you have a scout group that recycles sisal you might have a number of short pieces of sisal).


To attach the gate to the gateway: in the top corners of the frame, you need to tie in the sash pulleys (first prize), carabiners (second prize) or keyrings (best effort) to run the cord through. Looking at the diagram, you will see that 2 cords are tied to the gate, then run up to the pulleys: the turquoise one runs up into the pulley and then across to the second pulley, while the red one runs straight up into that pulley and then down. Tying the red and turquoise ropes together with a stopper knot will stop the gate at the correct height.

Once you have attached the gate to the gateway, you can raise the gateway up and while your assistants holde the gateway up, you need to sheer lash the upright poles to the stake. Providing you are using long stakes (+- 1.2m or 4 feet) you will be able to have the gateway without any guylines. If the ground is very soft or your stakes or short, you may need to guy the frame.

Allow 3 hours for an inexperienceed patrol to build this gateway.

2 experiments

This post is my first blueprint on the blog - an experimental project that I HAVE NOT BUILT- I'm putting it out there for you to try. If it works, please let me know. But be aware that you might need to tweak this a bit before it works.

These 2 projects were ideas in response to an e-mail I got from a scout called Shannie. The challenge was to design a gadget that could be used to hold a tin of boiling water as well as perform another function, and have a moving part. The equipment allowed was 6 1.5m dowels, 4 0.5m dowels and sisal. So here you go Shannie, hope they are useful ideas!


The first idea uses a long beam holding multiple tins of water. At one end it is supported by a 0.5m tripod and at the other end it is lashed onto the leg of a taller tripod that has a gas lamp or paraffin lantern inside, and is wrapped with a hessian/plastic bag on the outside to form a lantern. The problem with this design is that there isn't really a movable part- I suppose you could trade this off against the fact that you have space to boil several tins of water.


So... I got thinking about the way construction cranes work, and came up with the idea of using a central 'mast' which has booms hanging off it. the boom is made with a 1.5m lath and a 0.5m lath sheared onto the end to make a "fork" that fits onto the mast. The top of the boom is tied back to the mast with sisal. The mast is guyed to the ground as well.

You can see that the 4 booms are supporting 2 tins of water, one over the fire, as well as a gas lamp and ... a pot plant? (ok, the pot plant was in my component library so I dropped it in). You could easily use this to hang a camp fridge or your mess kits.

Let me point out where I think you might have problems if you try to build this one: You might need to be a bit creative about how you stop the base of the boom sliding down the mast- perhaps tying it onto the mast wit ha constrictor or playing with the tension the holds the 'fork' on. You might also need to be clever about how you attach the guylines.

Good luck, and please let me know if you try either of these and they work (...actually- let me know if they don't work, as well).