
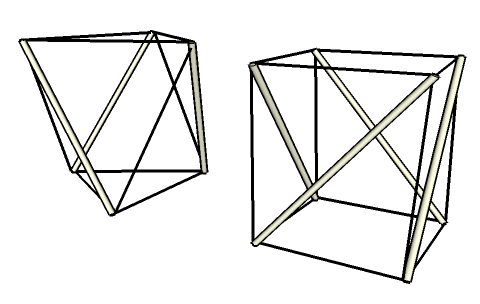
The type of tensegrity we are building is a tower that is made from a series of simple tensegrity units stacked on top of each other. Unlike the flagpole and the Needle Point Tower in this post which have 3 compression members per level, the tower I have photographed for the tutorial has 4 compression members on each level. The drawing above shows the unit for each tower.
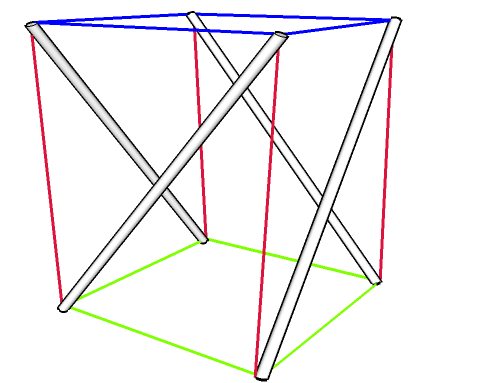 Let's look at the unit for now to try and understand a little better how the system works. There are 3 sets of cables- connecting the bottoms of poles together (green), connecting the tops of poles together (blue), and connecting bottoms to tops (red). Every end of every pole has 3 cables tied to it- one that is connecting it to the opposite end of another pole and 2 that are both connecting it to the same end of other poles. When you start building the tower, you need to remember this property otherwise things can get pretty confusing.
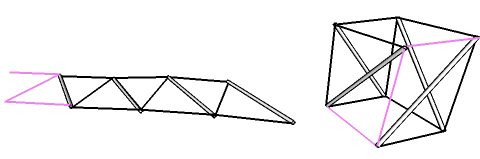 To build one of these units, the simplest thing to do is to lay the 4 poles out flat, and then tie 3 of them together, measuring carefully (more about measurements in the next post), leaving the 4th set of connections to be tied later. This gives you the flat layout on the left of this drawing. Once you start tying the fourth set of cables (purple in this photo), your unit will start standing up and taking shape.
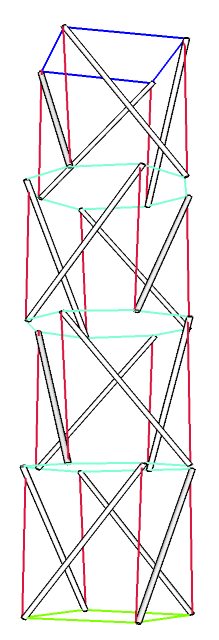 The actual tower is made by connecting a whole series of these units together vertically, so that the ring of cables at the bottom of one unit is also the ring of cables connecting the top of the unit below it (ie, so that the blue cables for one unit are also the green cables for another). You can see that we now have a green base, a series of turquoise base/top layers, and a blue top. The red cables continue as they would normally. It's also important to notice that the direction of 'twist' in each layer changes- one goes clockwise, the next anti-clockwise, the next clockwise again etc. This is so that the seam of the tower runs in straight line up the side, which makes life MUCH easier when it comes to assembling and putting up the full size tower. The next post will look at building an elastic band model, before moving on to the full-size tower.
3 comments:
I couldn't get this to work at all. There is nothing to stop the poles from just folding in and lying down.
Hi, this is probably because each level needs alternating chirality
The thing holding it together is the tension on the lines and compression on the beams. It's hard to increase compression on the members, so instead increase tension on the lines by tightening them.
Post a Comment