bridges (18) campsite (28) cartoons (15) centenary (3) discussion (5) experimental (51) gadgets (23) gateways (12) lashings (21) models (9) raft (84) resources (27) sculpture (16) software (22) techniques (42) towers (45) trebuchets (5) treehouses (17) tutorial (9)

December 29, 2006

Advanced Pioneering - Freemish cube

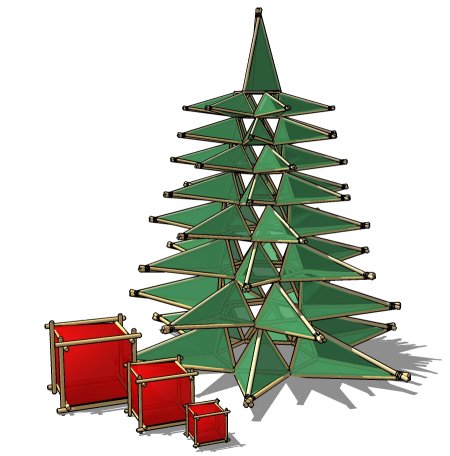
Last year Clarke at Scoutmaster posted some pioneering projects that he had drawn up. This got me thinking about how to model them in SketchUp and I finally got around to doing something similar. If the above cube looks like a quick and simple project, look again. Other than the obvious guys and bracing that needs to be added, there are some other problems...

To see how it's done, download the SketchUp model here. While you're at it, check out the competition that I posted this in, and I strongly recommend looking at some of the other objects that have been posted.

December 22, 2006

Festive greetings


2006 is drawing to an end, it's been a busy year for me at Ropes and Poles, and 2007 looks like being a good year, with the centenary of the first Scout camp.I've been very lucky to speak to a lot of people this year who have shared their pioneering projects with me that I hope to post in the new year. I'm switching my computer off now, and don't plan to turn it on until this time next week- so, happy belated Hanukkah/Merry Christmas/happy New Year/(insert holiday of your choice here).

PS- I'm pretty sure the tree would work if you used canvas or shade netting. The gifts/boxes would probably need a bit of work.

December 14, 2006

'New' lashings

John Thurman's book 'Pioneering Principles' (which I wrote about earlier and you can get here) describes 5 types of lashing for the first time.

2 of these have become widely known 'alternative' lashings- the Japanese lashing and the Filipino lashing.

He describes 3 others that have remained fairly obscure, but are nonetheless pretty useful. Here are excerpts from the book describing these new lashings:


Sailmaker's Lashing from John Thurman's Pioneering Principles

This excerpt from John Thurman's 'Pioneering Principles' describes an alternative to the figure of eight lashing for making tripods. I have come across this lashing before, it was in use in the late 90s in troops around Johannesburg. So, the Sailmaker's lashing:


Anyone concerned with rope work knows that the Sailmaker’s Whipping is a very good whipping for the end of a rope. It is simple to do, is a solid and secure job, and it looks attractive. Now, if it can be used for a three-stranded rope, why should it not be used for lashing together three spars? Through that process of reasoning we have been able to create the Sailmaker’s Lashing.
I am not going to describe it in detail because the Sailmaker’s Lashing is simply the whipping done on the end of three spars instead of the end of a three-stranded rope; there is no difference in method or result except perhaps to say that if you are putting on the lashing in order to make a tripod it must not be put on as tightly as would be done for a whipping. This is the same effect as in a sheer lashing: the tightening process occurs when you open out the spars and if you have made it too tight the only answer to the problem is to take it off and start again.
A further set of photographs shows you the Sailmaker’s Whipping as used on a four-stranded rope, and the same principle can be used for lashing four poles together, You may not want to do this very often, but it is as well to know that it can be done.


This item is reproduced here in compliance with the Creative Commons license held on the book.

Tourniquet Lashing from John Thurman's Pioneering Principles

This excerpt from John Thurman's 'Pioneering Principles' describes a FAST alternative lashing for lightweight structures:


This will shock the purists, but I am unrepentant.

Imagine a big Scout Rally with the main attraction publicised all over the town; “Pioneering Display”. If the publicity has been good along comes the public, the Mayor and Corporation, and the mums and dads. The order is given; the Scouts rush on carrying a tremendous assortment of ropes and spars. Expectation is very great. The Scouts start work with a will and they try very hard, but the minutes and the half-hours pass and all over the arena Scouts of various sizes are putting on square lashings, diagonal lashings, and possibly other lashings as well – and they are probably enjoying doing it. But the audience cannot really see what is happening and the expectation of the crowd subsides gradually into the boredom associated with any English summer afternoon when much has been promised and little is being achieved. The spectators remember pressing engagements, the Mayor begins to look at his watch, the District Commissioner becomes increasingly harassed and runs out of small talk. The Scoutmaster in charge knows that Lashing should not be hurried and yet wants to hurry it. Eventually the project or projects appear, but too late; no one is really interested now but thinking of tea and gardens. They have been kept waiting too long. Not an imaginary picture I assure you – I’ve seen it – I expect you have too.
How can we overcome a situation like this? The thing that is taking the time is the lashing, the most important and the least spectacular part of any enterprise in Pioneering. Well, there can be a certain amount of pre-lashing so that for the final erection of the bridge or the tower a very small number of lashings have to be put on (remember the bridge in “Boy Scout” at the Albert Hall), but even this can take a long time. That is why I commend to you for display work the Tourniquet Lashing. It is my own idea and I don’t think you will find it in any other book. As I said earlier, I am sure it will shock many people, but I hope it may shock some of you into trying it. It is illustrated above, and it does work!
Take a simple strop and then with a mallet handle or the butt of a stave you can fix two spars together by using the process of a tourniquet. Unless you are going to have a Scout holding the strainer of the tourniquet (an unpopular assignment) you must have a loop of rope or a piece of sisal, as shewn in the drawing, to fix it in place after tightening. Use this method for display purposes and I promise you that with a little practice you can put on a Pioneering Display that really does come up to expectations.
This is the method advocated in “The Ten-Minute Tower” which you will find described later in this book.
This leads to the final lashing suggestion, which will bring us to the end of a long but very important chapter and one which I hope you have found useful.
A great many valuable commercial discoveries have emanated from the thought of how to use something for a purpose for which it was not intended. Something is invented for one purpose and then ingenuity finds a different use for it. In lashing I cannot offer anything very profound except the tourniquet lashing and now this.


This item is reproduced here in compliance with the Creative Commons license held on the book.

Gilwell Scaffold Lashing from John Thurman's Pioneering Principles

This excerpt from John Thurman's 'Pioneering Principles' describes a new lashing useful for tying poles that need to be supported while they are being lashed:


If you have done any Pioneering at all you must have faced the difficulty of trying to lash one spar to another, possibly in a position high above the ground, when you obviously needed another arm, i.e., two hands to do the lashing and one hand to hold the horizontal spar in place. The problem is to make one spar secure to another before you have actually completed the lashing. Following the line of thought about eliminating the difficulties my thinking resulted in this: Why wait until I have done all the lashing turns before I put on any frapping turns? So, I experimented.
The Gilwell Lashing is simply this: Start in the orthodox way as for square lashing but, having made one set of lashing turns, put on one frapping turn. Providing you don’t lose the end of the rope this does hold the spars together and they cannot slip; you are therefore free to continue work in the traditional way. Put on a second lashing turn followed by a second frapping turn, followed by a third lashing turn and a final frapping turn, and finish with a clove hitch as in the square lashing.
I admit that this lashing looks a little clumsy because the turns do not fit neatly together, but in my estimation it is definitely stronger and consequently is more efficient, and in Pioneering it is worth sacrificing a little beauty for added strength. In addition, it is easier to tie except when you are working flat on the ground; you have more control over the spars when using this lashing than when using the traditional square lashing.


This item is reproduced here in compliance with the Creative Commons license held on the book.

December 6, 2006

Obstacle course explanatory drawings

When we built this obstacle course last year, I did a set of drawings to explain the course to the children who would be running through it. I thought they had been deleted but I found them recently. To download the SketchUp model, go here, and to read more, including an equipment list (and safety instructions), go here.

Click on any of these images to enlarge: