bridges (18) campsite (28) cartoons (15) centenary (3) discussion (5) experimental (51) gadgets (23) gateways (12) lashings (21) models (9) raft (84) resources (27) sculpture (16) software (22) techniques (42) towers (45) trebuchets (5) treehouses (17) tutorial (9)

April 30, 2006

Step-by-step pioneered sculptures: a pigeon


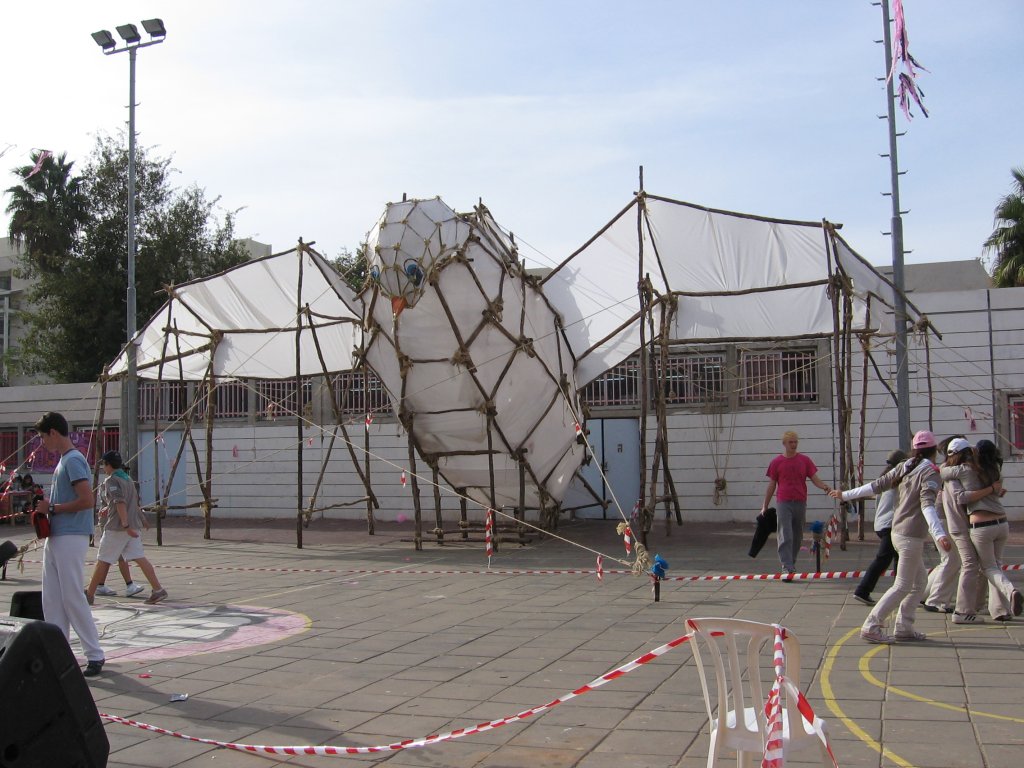
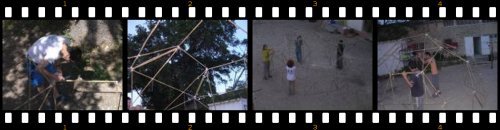
Gal Longin wrote in to me with drawings and photographs outlining the construction of a 6m (18ft) high model of a pigeon. Gal's shevet (scout group) in Tel Aviv was involved in building some of the constructions I blogged about here and here (shevet gimel's photos from this camp are here).

I'm going to quote heavily from Gal as I explain how these structures are built:

The first step is deciding on what to build and gathering together photographs for reference:

after we chose 2 or three project leaders for each structure they start designing the structures. they think of cool stuff to build that are connected to the main theme. after coming up with an idea we start designing. we try to get as much pictures of the object we want to build from different angles. we use the picture to define the breaking points that will create the wanted shape. we basically try to make round and complex shapes as simple as possible. instead of a round line we use a few different straight lines.


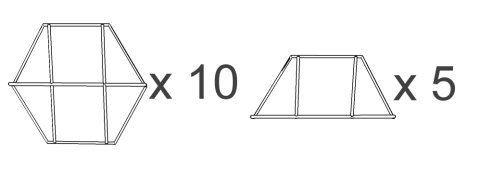
every structure we build is made up of simple shapes called "windows" connected. a window is basically a general name for anything that is a flat shape...

anyway, the people in charge of the structures look at pictures and determine where there windows will be placed within the object. after that they design the shape and size of every different window. most windows use basic geometrical shapes like squares, hexagons, octagons and decagons but they can have any shape you would like. the project leader then draw a accurate scaled sketch of each window and determine the exact size of each wooden stick and each connection.


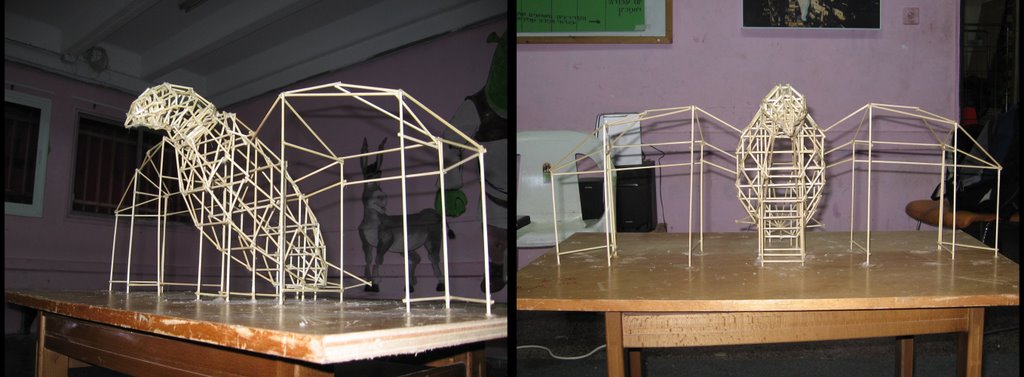
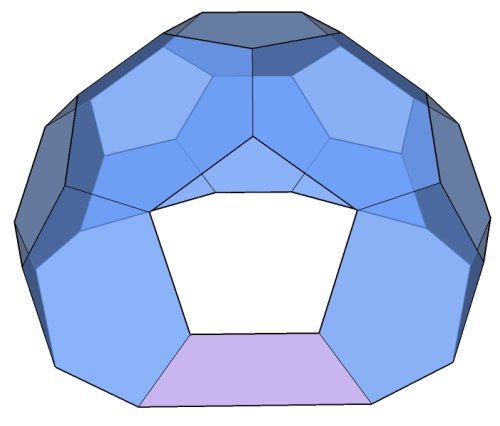
after drawing all the windows they build them in an accurate scaled model from small wooden skewers. after all the windows are built they connect them in the model and determine the exact length of each connection. they usually build the model at a 1 to 5 scale which means that every meter in realty is five centimeters in the model (technically it's a 1:20 because each centimeter in the model is equal to 20 centimeters in reality). after that they sometimes build a second or even a third model. the reason for building several models is that you can learn from each model and improve.


the last model is usually on a 1:10 scale, which means each meter in reality is ten centimeters in the model. the bigger model is built from bigger skewers.

...after completing the last model the project leaders determine a work plan and divide the work for the three days of building.
they determine specific deadlines for each stage of the work process and define the schedule for every hour. all of this accurate planning is done because three days isn't really a long time to build these huge structures and we can't waist any time while building. while building everybody must know exactly what there job is. usually there are about twenty to thirty people working on each structure at a time.


the planning and designing process takes about 2 months. in early June we start working on special accessories we need for these structures.by accessories i mean stuff like eyes for animals, teeth, toes and fingers, claws and even entire heads. everything that is small and lightweight and we can take with us to the camp inside a truck. we work on these accessories for three - four weeks ...
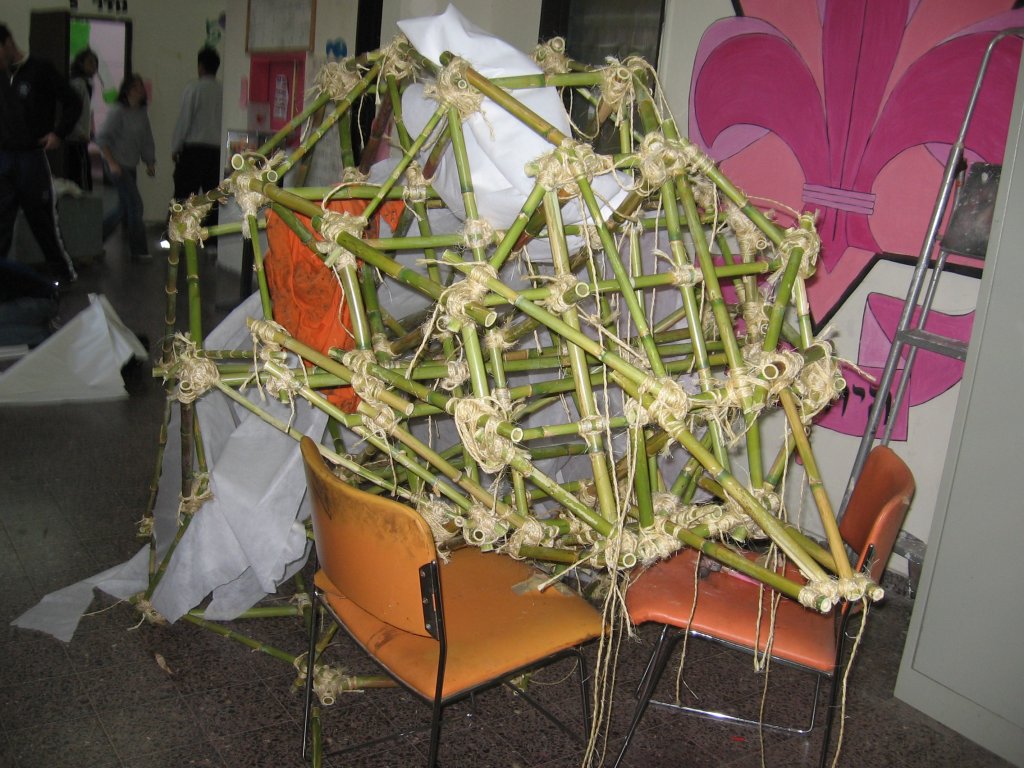
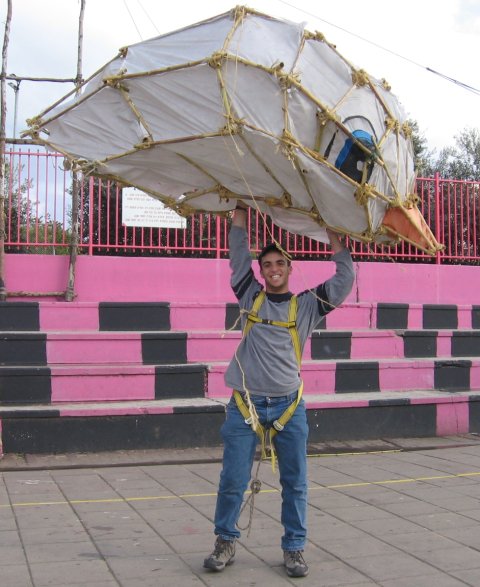
...we build these accessories from many materials. eyes and teeth are usually made from cloth sawed together and stuffed in something. for bigger shapes we use special net used in chicken coops that is very easy to manipulate and can also maintain it's shape. we cover this net in cloth or paper mesh. heads and larger stuff we build from small bamboo like sticks tied("lashed") together. some heads who require exact and round shapes are built from a construction metal and wooden planks, covered in cloth


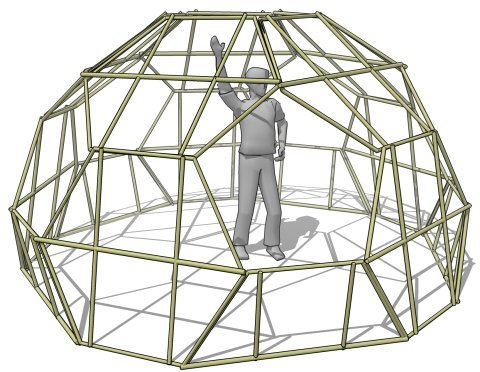
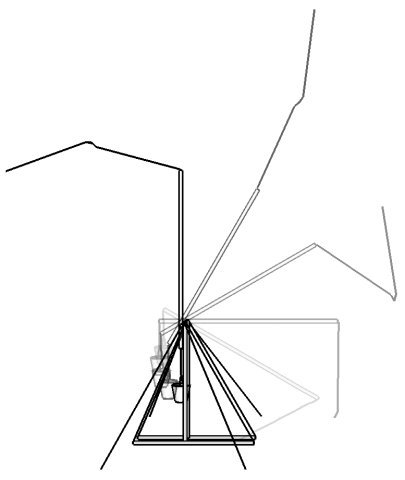
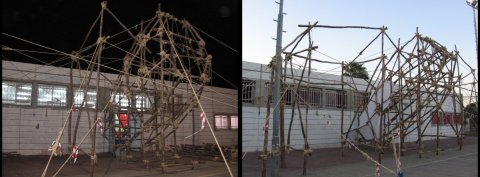
The last few photos show the pigeon under construction, before the cladding is put over. This style of pioneering is a great test if a troop's planning,attention to detail and enthusiasm. Thanks again to Gal for explaining in such detail how to build this type of structure. Now that I have seen how it is done, I am keen to suggest this to my own troop (maybe you could show it to your scouts). Let's see how they respond to that...

April 23, 2006

Updates at Ropes and Poles

Over the next few days at ropes and poles I will be moving over to a new provider for e-mail updates- if you are signed up to get e-mail updates, please bear with me- it is possible you might get double e-mails in the next day or two. Hopefully it will be sorted out soon. If you are NOT already a subscriber, you can get the feed (RSS) here or e-mail by filling in this form:

Delivered by FeedBurner


I've also updated the Geodesic dome post based on some corrections sent in by the designers.

Finally, take a look at my tutorial on SketchUp, the software I use for the drawings on this site

Sketchup for Scouts: beginning tutorial

Sketchup is the software I use for the drawings on this site. It's simple, fast and produces clear, clean drawings. There is a free version that is unlimited, and a Pro version that adds 3d file export and a few other goodies. So download the latest version here, and once you have got it up and running, join me for a quick tutorial.

I will be looking at drawing the simplest pioneering structure, the tripod.In the next few drawings I will be introducing you to most of the basic tools in SketchUp, and some of the most important concepts (click on any of the pictures to see a full-screen view of it).


Open Sketchup and look in your toolbars for the circle tool. Click on it, then move your mouse over the white area in the middle of the page. Your circle should turn blue- this means that it is going to draw flat on the floor (Sketchup uses 3 colours- red, blue, and green, to represent different directions. Blue is flat, green is vertical north-south, and red is vertical east-west. This way, anytime a line turns a certain colour, you know it is lined up with that direction). Click a point to select the centre of your circle, then move the mouse and watch how the circle gets bigger and smaller. Down in the bottom right hand corner of the page is a little box with a number in it that changes as you move- this box is called the Value Control Box, and at the moment is showing the radius of the circle. We want the radius to be 100mm (4 inches if you are working in Imperial measurements) so you can either move the mouse until this value reads properly, or you can do this:just click anywhere to make a circle of any size, then type in '100mm'and hit enter. The circle will resize to the number you typed. This works for almost every command in SketchUp that takes a number as an input. This only works when it is the VERY NEXT THING you do after placing an object.

One of the cleverest thigns about SketchUp is how you navigate in 3d space. If you are using a mouse with a scrollwheel, roll the wheel up and down. This ZOOMS in and out. Now hold the mouse wheel down and drag the mouse. This ORBITS or moves your eye around the model. Now hold SHIFT + the middle mouse button and drag- this PANS the page around. Move around like this a bit to get comfortable. IF YOU WANT TO GET THE MOST OUT OF SKETCHUP, YOU NEED TO ORBIT,ZOOM AND PAN CONTINUOUSLY. As you are drawing, these tools are available- you can always zoom in and out, orbit and pan- even while you have placed a circle and are still sizing it. Next, let's turn our flat circle in to a 3 dimensional drawing:


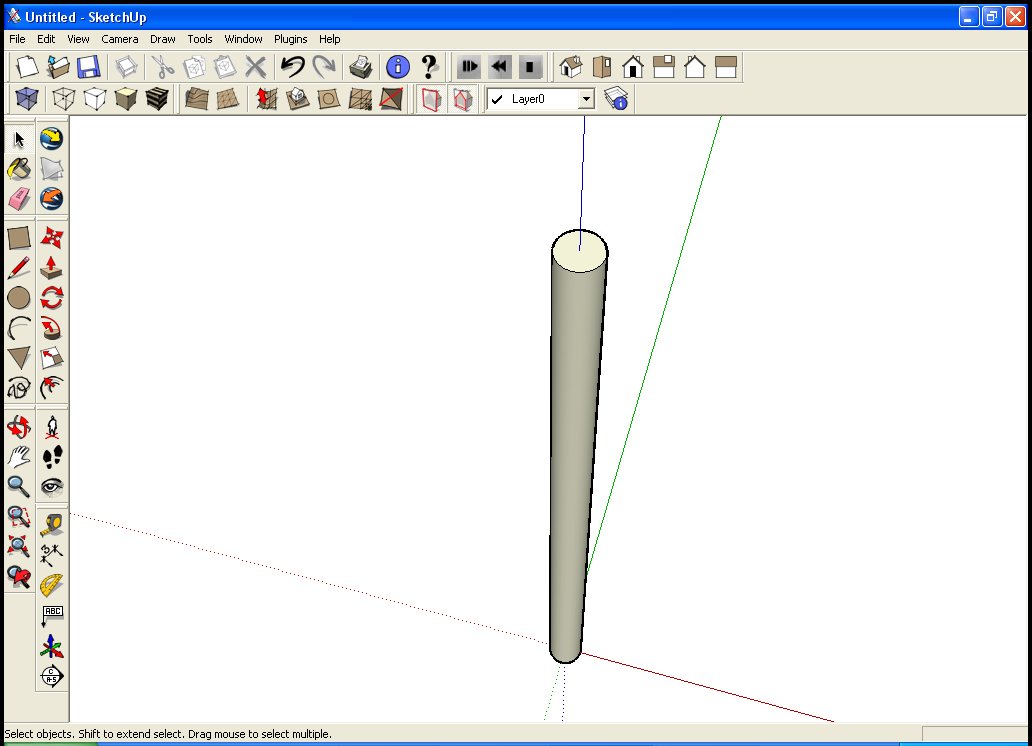
Look for the tool that has a box with an arrow pointing up. This is the push-pull tool, and you will spend a LOT of time in SketchUp using this tool. Click on the tool, then click on your circle, release, and move the mouse. Watch how the flat circle is turned into a pole ( I hope that answers your question, Meydad). I want a 2m long pole, so I will just click the mouse to end the pole, and type in '2000mm' to set the height.


A very important discipline to learn in SketchUp is to group everything together. At the moment, if you click on your pole, you will see that the part you click on is highlighted- click the circle on top, it highlights. Click on the black edge, and it highlights (by turning yellow). We want to be able to easily select the WHOLE object and move it around. So a few tips: Double-clicking any entity (a line or a face) will select that entity and the edges or faces around it (double click on the middle of the circle on top of the pole and you will see the line around the edge selects as well); Triple clicking selects all of the entities connected to it. Triple-click to select the whole pole (top,bottom and the line around them) then right-click. We are going to look for an option called 'make component'and click on it.

A component is one way of joining entities together to make it easier to work with them. Give your component a name, and make sure that 'replace selection with component' at the bottom is selected. Components are very similar to another collection of entities in Sketchup called a group. This is the difference: every component in a drawing is EXACTLY the same as every other component with the same name. So if you make the pole a component, then make a few copies of it (I'll show you now how to do that...), when you go and change the length of one pole, all of the others will change. You would use groups if you don't want that to happen (there are other ways around it, but for today, that's a good enough explanation). So, make a component from the pole, and remember that components are all copies of each other, and changing one will change all of them.


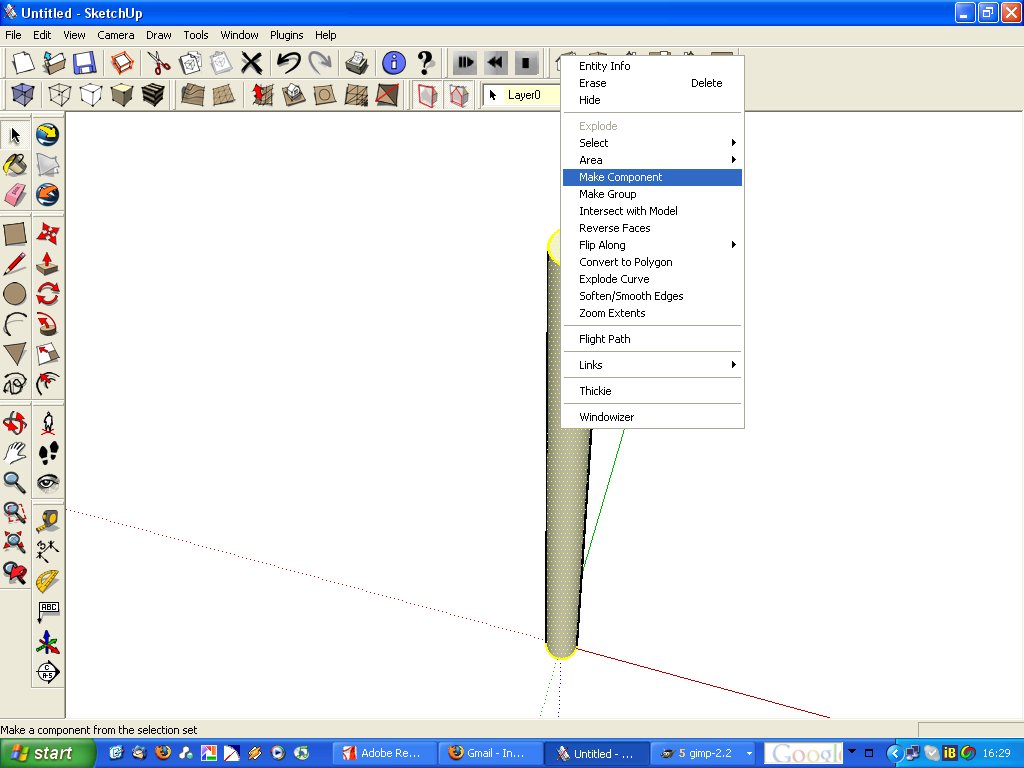
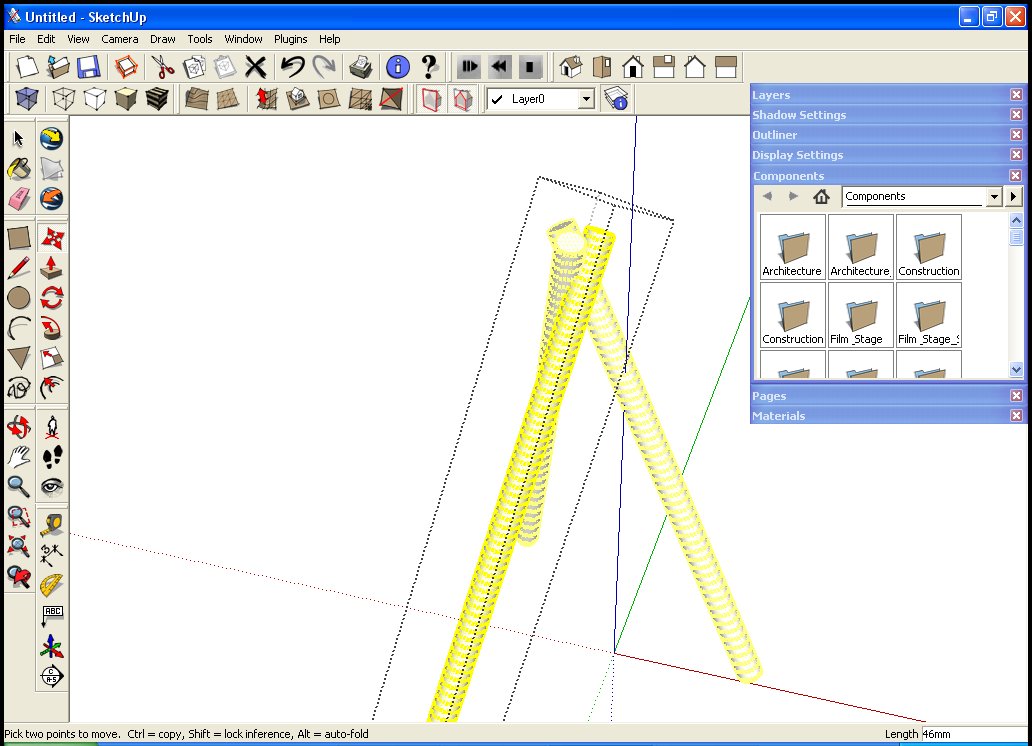
The move tool is next. This tool is a bit sneaky, because it is actually move, copy and rotate all rolled into one tool. Click on an object and move the mouse to move it- notice how SketchUp tries to keep you in the red,green or blue directions- this helps you keep your drawing accurate. New hit escape and try holding down 'ctrl'and clicking on an object (I think that's option-click on a Mac). You should see your cursor adds a small + to it- this means you are in 'copy' mode. The final thing this tool does is rotate. That's what we'll use it for right now- select the move tool, and move the cursor over the pole. You'll see a yellow box around it, and 4 red + marks. When you move the cursor over one of these, a protractor (circle with angles marked on it) pops up on that box face. Click and drag to rotate the pole.
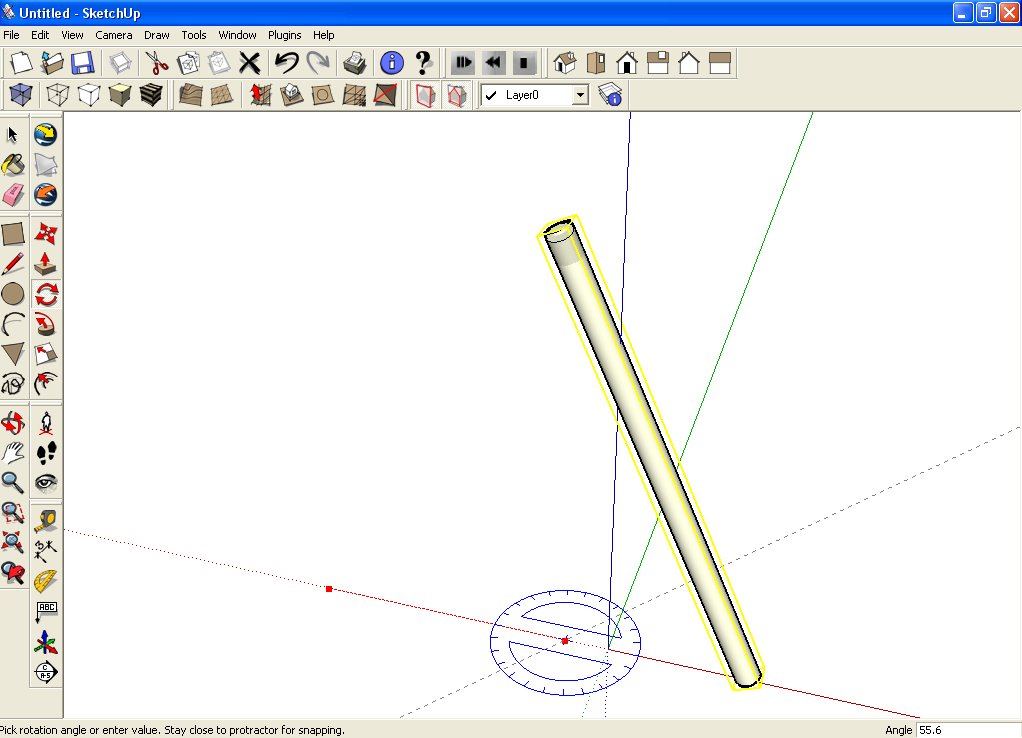


The last new tool to learn(for this lesson) is the 'rotate' tool. Select the pole, then click on the rotate tool (try clicking on the rotate tool without selecting anything to see how it reminds you what you are doing wrong). Like the circle tool,the rotate tool also tries to guess which direction you are working in- it should turn blue as you move it onto the area under the pole. Like the move tool, the rotate tool ALSO has a copy tool hidden in it- move the protractor under the pole and ctrl-click it (making sure the + appears on the cursor). Now when you move the mouse you should see a second pole rotating around. Place it and then type in '120' to set the rotation angle to 120 degrees. We want to actually add two poles, not just the one, so type in '2x', and you'll see another pole appear (this trick also works for move-copying)


We are nearly done- you should have a tripod of some kind- but maybe like mine the poles pass through each other, or maybe they miss altogether. This is not good pioneering :), so we will try to fix that.


Double-click on one of the poles- notice how the other poles have faded away a bit and the box around the pole is dotted. You are now working 'inside the component', you can always enter any component any time in Sketchup to do this. Still working inside the component, triple-click it to select all the parts, and select the move tool. Now as you move the pole around, notice that the other 2 poles move as well- because they are all copies of the same component.


Move the pole until the three are just touching, then hit escape to close the component.


Almost done- the last thing to do is to select all the poles- click the select tool ( the cursor arrow) and draw a window around them. Make sure all three are selected, then right-click and choose 'Make Group'.


Now that you have made a group, you can select it and copy it (by using ctrl-move) to line 3 tripods up like this.

And that's your first SketchUp model done! Plus you know tools that you will be using over half the time you are working in SketchUp.

There are a few resources you can look at for more help:
-Print out the quick reference card (for PC or Mac) and keep it next to your computer all the time.
-Watch the video tutorials if you have broadband- this is the BEST way to learn SketchUp.
-Check out the self-paced tutorials that come with SketchUp.
-SketchUcation is a website with more advanced tutorials, a good place to learn some nice tricks, especially if you want to be able to work QUICKLY in SketchUp.
-Finally, join up at the SketchUp official forums and ask for help there- people are VERY helpful and you will have an answer to just about any SketchUp related question in a few minutes. One tip- please do a search on the forum to see if your question has already been answered.

April 16, 2006

Geodesic dome with bamboo and lashings

 UPDATE- Meydad from the Alon shevet, who built this dome, have written a comment with some corrections for this project. Here is the summary of changes: -The placement of poles was wrong in the hexagon panel. This has been fixed and example dimensions have been added. -It is suggested that you add an extra (open) frame around each pentagon. -My idea about the hanging bottle holding the whole thing together was wrong (luckily I'm not an engineer!) This drawing summarizes the corrections: If you want to know how to draw an ordinary dome in SketchUp, read this tutorial at SketchUcation. The original post:I was wondering the other day how to make a pioneered geodesic dome when a link to this project arrived as a comment on my blog. If you look carefully you will see that this dome is made out of hexagons and pentagons - the pattern used for a soccer ball(if you're too sophisticated for soccer, try a truncated icosahedron). More photos of the construction are here. This is yet another amazing piece of pioneering from Israel. This is how I understand the structure: The concept of this dome is very simple: it is made from 2 different types of frame: a hexagon and a half hexagon- you will need 10 hexagons and 5 half hexagons. These are combined into a structure very simply: in the picture below, each blue face is a whole hexagon, each purple face is a half hexagon: Your completed dome should look like this one: (if you try to build this one for yourself, take careful note of the bottle suspended from the top 'window'- I think this might just be holding the whole dome together- This is to show how strong the structure is.

April 6, 2006

Trebuchet Slings- release points

My very first post to this blog was a trebuchet, and it still attracts a lot of traffic. Our troop has learnt that the difficulty of a trebuchet isn't in the construction, but in the fine adjustment of the sling to get the right release point. The drawing above shows how the sling whips around, and then SLIDES OFF THE END OF THE TREBUCHET ARM. You want the projectile (water balloon, rotten potato, flour bomb etc.) to fly out of the trebuchet when the angle of the arm is close to 45 degrees. A quote from my earlier posting about the sling:
The crucial component here is the sling- made from a diamond of leather stitched to two cords. One end of the sling is tied to the end of the throwing arm, the other has a loop tied around it which is slipped over the throwing arm. When you release the trebuchet, the arm swings around and flicks the sling around.


This photograph captures a moment just after the arm has reached the end of it's arc- the lst frame of the drawing above. This release was too early, you can see that the balloon (small green object to the upper right of the image) is directly above the trebuchet, instead of flying forwards. This image also shows the sling clearly- in this case made from an old leather handbag I persuaded my mother to donate to this worthy cause.

This small trebuchet is a good design to learn about siege engines with, being lightweight and easy to load. For more exotic designs, I can recommend William Gurstelle's Trebuchet book at Amazon.com.

Remember that siege engines can be dangerous. Ensure that the field you are working in has been cleared of people. Clear the areas immediately in front of AND BEHIND your trebuchet before firing. Note that building a trebuchet may be illegal in your area- investigate the law BEFORE building one.

April 5, 2006

Knotting books- Two recommendations

There are a number of excellent books on Knotting available, but I want to recommend two: one that you can carry in your pocket, and another that will pass MANY hours when the weather keeps you inside instead of out building structures.

Collin's Gem guides are pretty useful pocket-size guidebooks. The Collin's Gem: Knots book is particularly good, covering most of the essential knots and one or two of the more unusual ones.


Once you have mastered the Jury Masthead and the Matthew Walker knot and want to move on to bigger challenges, then you need to look at Ashley's Book of Knots. Clifford Ashley spent literally decades writing this book- at the time it was published, practically every single knot known at the time was in this book. In fact, most knots can be referred to by their illustration number in Ashley's (sometimes abbreviated to ABOK). Other than a number of knots that have been invented in the last 50 years (mostly climbing knots), everything you need to know about knotting is in this book.

(click on any of the links to buy the books at Amazon.com)

April 3, 2006

Animated Knots Website

Grog's Animated Knots Page is an incredible Internet resource for learning knots. Grog has done some SERIOUSLY clever coding work, and the knots all 'tie themselves' in a step by step animation. Some knots even have an option to be shown upside down, mirrored or from behind. So for any knot you want to know, from A to Z (well, W) check out Grog's Animated Knots page. Grog also has a really nice little system where he puts your own site logo on top of the site when you link to it- so you can have your scout troop's logo on the page.