UPDATE- Meydad from the Alon shevet, who built this dome, have written a comment with some corrections for this project. Here is the summary of changes:
-The placement of poles was wrong in the hexagon panel. This has been fixed and example dimensions have been added.
-It is suggested that you add an extra (open) frame around each pentagon.
-My idea about the hanging bottle holding the whole thing together was wrong (luckily I'm not an engineer!)
This drawing summarizes the corrections: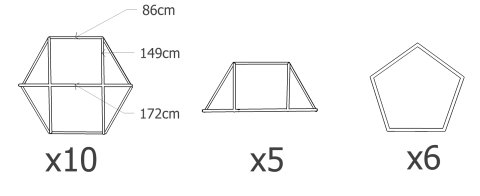 If you want to know how to draw an ordinary dome in SketchUp, read this tutorial at SketchUcation.
The original post:
If you want to know how to draw an ordinary dome in SketchUp, read this tutorial at SketchUcation.
The original post: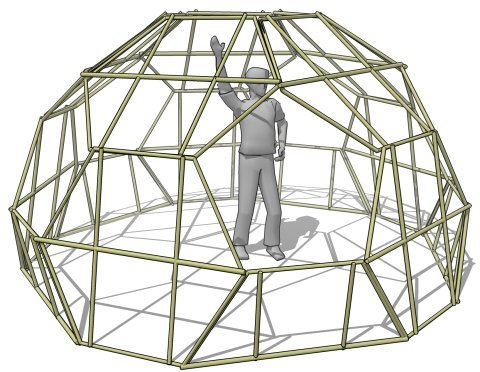
I was wondering the other day how to make a pioneered geodesic dome when a link to this project arrived as
a comment on my blog. If you look carefully you will see that this dome is made out of hexagons and pentagons - the pattern used for a
soccer ball(if you're too sophisticated for soccer, try a
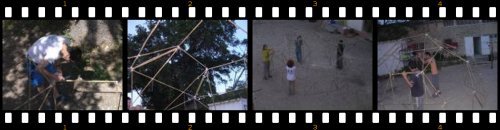
truncated icosahedron). More photos of the construction are
here. This is yet another amazing piece of pioneering from Israel.
This is how I understand the structure:
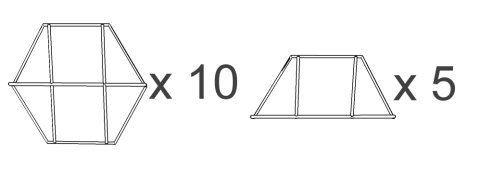
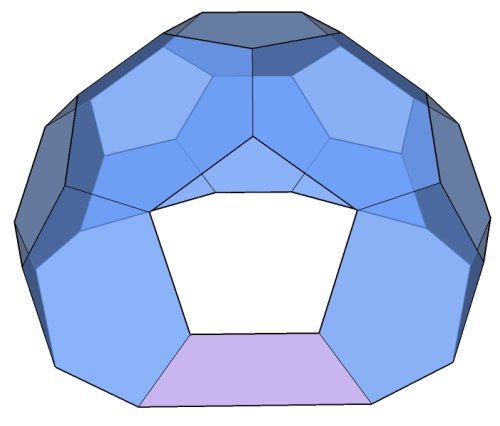
The concept of this dome is very simple: it is made from 2 different types of frame: a hexagon and a half hexagon- you will need 10 hexagons and 5 half hexagons. These are combined into a structure very simply: in the picture below, each blue face is a whole hexagon, each purple face is a half hexagon:
Your completed dome should look like
this one:
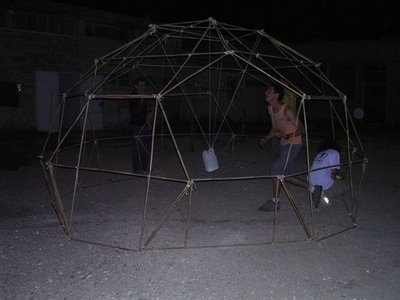
(if you try to build this one for yourself, take careful note of the bottle suspended from the top 'window'-
I think this might just be holding the whole dome together- This is to show how strong the structure is.

 If you want to know how to draw an ordinary dome in SketchUp, read this tutorial at SketchUcation.
The original post:
If you want to know how to draw an ordinary dome in SketchUp, read this tutorial at SketchUcation.
The original post: I was wondering the other day how to make a pioneered geodesic dome when a link to this project arrived as a comment on my blog. If you look carefully you will see that this dome is made out of hexagons and pentagons - the pattern used for a soccer ball(if you're too sophisticated for soccer, try a truncated icosahedron). More photos of the construction are here. This is yet another amazing piece of pioneering from Israel.
 This is how I understand the structure:
 The concept of this dome is very simple: it is made from 2 different types of frame: a hexagon and a half hexagon- you will need 10 hexagons and 5 half hexagons. These are combined into a structure very simply: in the picture below, each blue face is a whole hexagon, each purple face is a half hexagon:
 Your completed dome should look like this one:
 (if you try to build this one for yourself, take careful note of the bottle suspended from the top 'window'-
8 comments:
I should start my comment with thanks for you for sharing my pictures and project.
Here are some corrections and add-ons:
A. The poles inside the hexagon structure end at each edge. What’s making it look like 2 triangles and a square at each half hexagon.
B. To make the dome stronger, you should make an inner structure inside every pentagon. You can see how at the top pentagon inside the last picture.
C. The hanged bottle is to show how firm the dome is, and not for "holding the whole dome together".
D. Here are the measurements:
- each side pole is 86cm (6 of them).
- the middle pole is 172cm (divided 43cm-86cm-43cm).
- the two other poles are 149cm (divided 74.5cm-74.5cm).
E. Please teach all readers and me how to make a pole shape with sketch up!
F. Sorry for my broken English.
Thanks for the corrections. I'll update the drawings and text and also post a short Sketchup tutorial on the weekend. What is your name and your shevet name?
Basically, a pole in Sketchup is made by drawing a circle,typing in the radius (eg. 10cm) and then using the push/pull tool (the box with an arrow on it) to pull the circle up to height. I will post a short tutorial showing how to model a simple project later.
His name is meydad I guess, and the shevet built it is Alon.
We'll wait for the SketchUp tutorial!
Updates and corrections have been done, and here is your SketchUp tutorial.
nice one , just wondering how did u guys manage to tie a knot on the edges ?? wouldnt it slip away ?
I hope we can get an answer from meydad about this, but my guess is that they used knots like the constrictor that don't slip.
Hey, I was also one of those who made that one. (with the black shirt and green pants in the pictures)
It didn't slip away because we used some white glue on every lashing and let it dry before we've put the whole thing together.
I like this very much but have no idea how to do the lashing.
Post a Comment