bridges (18) campsite (28) cartoons (15) centenary (3) discussion (5) experimental (51) gadgets (23) gateways (12) lashings (21) models (9) raft (84) resources (27) sculpture (16) software (22) techniques (42) towers (45) trebuchets (5) treehouses (17) tutorial (9)

January 26, 2007

Hypar pavilion - inspired by Felix Candela


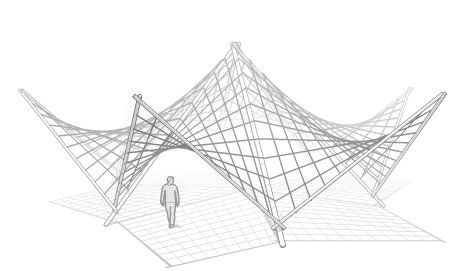
'Hypars' (hyperboloids) are a type of structure that have been used in pioneering since the 1960s. They are based on a type of lightweight engineering structure used to build in concrete. This six-sided structure is inspired by Felix Candela's Restaurant in Valencia (photo by festeban).

Although they look complicated, these structures have a secret that makes them a little easier to build- all of the strings used are pulled tight in straight lines. This means that you don't need to worry about how the curve gets formed- it is a natural result of tying all the straight lines.

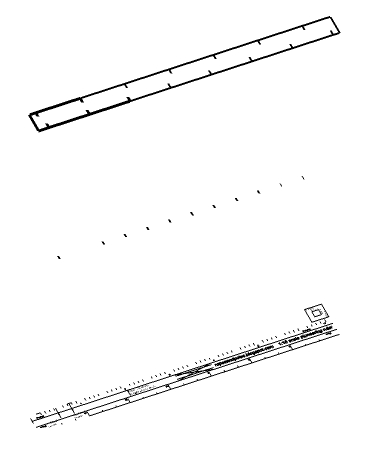
This sequence demonstrates how to build one:
(1) lash the rectangular/diamond-shaped frame together, and prop 2 corners up with poles.
(2) run sisal from one pole to the opposite pole, starting at one end and working to the other end, making sure the lines do not cross each other. Start with a round turn and two half hitches and end with a clove hitch or constrictor.
(3) run a second set of lines between the other two poles. Once you have done this, you will be able to remove the props- but you will need guylines to hold the structure up. The sisal is actually holding the whole structure in shape. Because there are so many of them, none of them are under a lot of strain (which is why they are used to build in concrete- you can make the concrete VERY thin because the strain is spread out evenly).


If you take six of those units and attach them together you get the structure I have drawn here. This drawing shows the frames without the hypar lines.

What could it be used for? I'm open to suggestions- how about a chapel for a Scout's Own, a 'headquarters' tent at JOTI/JOTA or a café at a Jamboree? One word of caution: the 'saddle' in the centre, the lowest point of the curved surface, can often end up being VERY low. This is a place where a model can be used to figure out the right heights and angles before construction.

January 19, 2007

Scale ruler for pioneering models: 1 in 15 Kontiki edition


Kontiki, the annual raft-building competition in our province, is coming up in the beginning of March. The competition rules require a 1:15 scale model of the raft to be built. This is an unusual scale- the nearest metric scales are 1:10 and 1:20, while the nearest imperial scales are 1':1" (1:12) and 1.5':1" (1:18). I drew up a ruler (PDF, 642k) to help my Scouts build the model, and have made it available for anyone else who needs one. The ruler has metric (to 6.5 metres) and imperial (to 21 feet) measurements: although most things in South Africa are measured in the metric system, pioneering poles are typically available in 3 foot increments. The diamter and height of a 200 litre steel barrel, as well as the maximum structure height allowed by Gauteng Kontiki rules, are also marked.

The PDF file makes 2 rulers, and has full instructions for printing at the correct size.

Note: if you are interested in SketchUp: the lineweights were all generated in SketchUp, using the 'depth cue' edge mode, and switching the camera to parallel projection- three lineweights were established in the drawing, on seperate vertical levels. The nearest layer to the camera was used for the thickest lines, and the furthest for the finest lines. Here is a view of the model that shows how the lineweight 'layers' were set up:

Final page setup and layout was done in the new SketchUp Pro add-on package, LayOut.

January 12, 2007

SketchUp 6 released!

SketchUp 6 was released this week after a rather long wait. Several new features have been included, and you can download it for free here.

The first new feature I will talk about is the Styles system- you can now have 'sketchy' looking styles that use real, scanned images of paint brush strokes, pencil lines etc. You can add watermarks and paper textures. There is also a new fog tool (which the top image on the left uses). These tools taken together give you many more options when it comes to presenting a model. Click on the image at the left or click here to see the images full-size. If you are adventurous and would like to scan your own lines to make a style, you can read about it here.


Another new tool is 3d text in SketchUp - so you can include text on the side of buildings, emboss your name on the bottom of objects you design etc. using any font you have installed on your system.


The final tool, and one of the most exciting, is the Photomatch function. You can take a photograph (like this one of a joint meeting between my troop and Constellation Air Scouts) and 'trace' over it in 3d to build a quick 3d model.

All in all, SketchUp 6 has some exciting new tools and improvements, and although the download is around 50Mb, is definitely worth the time.

January 8, 2007

The Tolmer's Tackle

(This method for tightening a rope without a block and tackle is from the November 27,1952 edition of 'the Scout'- a weekly Scouting newspaper from the UK. John Sweet's original text describing the tackle follows after the drawing.)


"White Owl" of Stoke Newington, has reminded us that some time ago we wrote a piece in 'Scoutward Bound' about unorthodox rope tackles for applying strains to heavy ropes when no blocks, etc. are available.

"White Owl's" particular problem was to construct a Gamekeeper's Bridge across the tank trap at Tolmers, the I.H.Q camp site in Hertfordshire. The foot-rope consisted of a 7 inch hawser, and as the total span was pretty considerable and the only available manpowers two Rovers plus himself, "White Owl" realised that something quite out of the ordinary was needed.

Here is his description of how the job was tackled:

"The main ropes was secured to a tree at one side of the tank trap and tied off to a second tree on the farther side. Two fairly strong ropes were bent on to the hawser about half-way down its length and made fast under strain to convenient trees (C and D), as shown in the diagram.

Two lighter heaving lines were clove-hitched to these secondary ropes (F and G) and pass over and round the ropes on the opposite sides of the hawser and brought back to the side on which they were secured.

To operate the tackle, my two Rover assistants hauled in simultaneously on their heaving lines, thereby springing the three ropes together, whilst I applied a whipping, starting at point E and working upwards at each new heave. The clove-hitches were slide farther and farther up the hawser towards the anchorage as the strain increased.

This had the effect of moving point E slowly but surely towards the anchorage B, and we were able to take up the slack in the hawser between E and B on the anchorage itself. When the job was finished (it took time!) a load of about 224lb. in the centre of the bridge caused only a three-inch sag."

Well, there you are. You will never find the Tolmer's Tackle in the book, but it was found in practice to be efficient.

How about your Patrol trying it out?

Mind you, I am all in favour of using the orthodox methods whenever possible, but pioneering is meant to be an adventure and so long as you don't take undue risks there is no harm in experimenting with ideas of your own.