bridges (18) campsite (28) cartoons (15) centenary (3) discussion (5) experimental (51) gadgets (23) gateways (12) lashings (21) models (9) raft (84) resources (27) sculpture (16) software (22) techniques (42) towers (45) trebuchets (5) treehouses (17) tutorial (9)
Showing posts with label campsite. Show all posts

May 2, 2024

The Brownsea 66 Tower

Like the tilting mast tower, this is from the Dutch JOTA-JOTI handbook CD, originally in Dutch and published in English here for the first time. Here's a render from my SketchUp model, followed by a translation of the original Dutch article including drawings.


The Brownsea 66 Tower

This tower was designed by the "Brownsea 66" group in Rotterdam and used during the JOTA in 1977. It is a pioneer piece with a modern design and, in addition to its task as an antenna carrier, also works excellently as an "Eye-catcher". 

The construction consists of two tripods that are attached to each other at the open sides with round lashings. Six crossbars keep the three-posts apart and the tower is braced with three guy posts. 

The procedure is as follows: 

 1.Check the six posts that will form the three uprights for cracks and tears. Pay particular attention to damage that is transverse to the grain of the wood, because there will soon be tension on the posts. This increases the chance that new longitudinal cracks will develop. In short, use very good lashing posts for this construction. 

2. Then attach two piles in line with each other using two scaffolding lashings per pile couple and reinforce the connections with wedges. Make sure that the total length of each upright is the same. 

3. The top and the base of the tower are tied with figure of eight lashings. Always work towards the end of the posts. This prevents unnecessary pulling through of the ropes.

4. The cross bars are then pioneered between the uprights with square lashings. The posts will be placed on the outside of the uprights. The starting clove hitch comes on the crossbar because the pressure on the lashing runs in the direction of the crossbar. Make sure that the distance between the uprights is kept the same. 

5. The tower can be guyed with guy lines that are attached to the bottom with pickets or with three-to-one handholds. In the design use was made of guy-posts, which were attached to the inside of the uprights with cross lashings just above the first group of sleepers. Optionally, the diagonal lashing can also be used for the top attachment of each guy-post, because this must after all prevent the tower from giving way. 

6. The tower can be raised with a giraffe (a vertical pole or pair of shear legs which are tied to the tower, and then to a block and tackle to allow the tower to be lifted off the ground). The vertical adjustment can be carried out using the strut posts. It is recommended to bury the foot of the tower. 

diagram of a giraffe in use on a simple mast

7. This tower is very suitable as a carrier for heavier antenna types that can be placed even higher with the help of an extension pole at the top.


June 9, 2017

Elevated tent platforms at KonTiki 2017

In rainy weather (and KonTiki frequently brings rainy weather), it can be a good idea to get your tent up out of the mud. Bush Hill Scout Troop built this four-tier stepped tent platform for their campsite at KonTiki 2017. The two highest tiers had enough clearance underneath to be used as part of the campsite as well.

I wrote about a three-storey tent tower built by 1st Walmer Scout group in 2012 


May 26, 2017

Everything was awesome at KonTiki 2017

KonTiki 2017 took place recently, and was the coldest  and one of the stormiest KonTiki weekends in some time. In spite of the rain, wind, hail and frost, 55 teams arrived to camp, taking part on this year's theme of "Let's Play!"

 Friday afternoon saw a hail storm that sent many teams running for shelter, but by the time I was on site in the vening, construction was going ahead under lights along most of the shore.


This year, many teams had LEGO-themed decorations in their camp sites, from bricks and blocks to minifigs.

The poor weather continued on Saturday, and in the end about a dozen teams spent the hwole night on the water through the wind and rain - here they are the next morning, when the sun came out for a beautiful sunrise and morning.

Congratulations to the over all winners, 1st Eagles. The full, detailed resulsts scoresheet is available here.

I'll be taking a closer look at some of the campsite details from this weekend in the next few weeks.

May 30, 2014

'Green' camp gadgets- recycled planters and plastic 'rope'

There were several interesting gateways at KonTiki 2014, and I'll post some more info about those in the coming weeks. Here are a few little gadgets from the campsite that won the camping side of the competition, 9th Benoni.


First up are these camp 'potplants' made from an old pair of shoes with succulents planted in them. They rest on an Ocean Plait mat, woven from scrap rope that has become too weak to use for pioneering.


The boundary ropes of the campsite were made from this recycled rope, woven/plaited from empty plastic shopping bags that the troop collected over the past few months. (That's not the competition gateway but a photo from a test camp held a few months ago)

May 24, 2013

Dreamcatcher Gateway


The theme at KonTiki this year was the Wild West, and my troop, Ninth Benoni, decided to lean towards Indians rather than Cowboys. One of our Assistant Troop Scouters, Greg Gardiner, designed this gateway, and led the Scouts in harvesting the materials and building it over the course of a few weekends.

Greg started with a sketch of what he was aiming to achieve. The Scouts had made small dreamcatchers to decorate the raft with, and this large one ties the campsite design back into the raft design.

The first step in the process was harvesting willow branches from the trees that grow at our Scout hall. Willow has been harvested like this for centuries to make baskets, eel traps and other craft items, and the trees recover with no ill effects. A circle was staked out on the ground and the willow branches wrapped around this circle, braiding and twisting the branches together the whole time.

After the frame was complete, the string net was tied into the frame. It became clear that the will alone would not be strong enough to hold its shape, so a square frame of laths was added on the outside.

The entire gate was suspended from the gateway frame from a rope that had a twist put into it, so that if left to swing, the gate would automatically close itself.

February 15, 2013

May 25, 2012

Kontiki 2012: Main Stage

Kontiki 2012 is underway, 36 teams are busy building their rafts down at the waterfront at Arrowe Park, and will be launching on Saturday morning. I'll post more about the rafts later, but there is a structure down at the waterfront that I'm featuring now.

The main stage was designed and built by Gregory Weeks from First Benoni Sea Scouts, and fitting with the Viking theme of Kontiki 2012, is designed as the prow of a submerged boat sticking out of the ground. It stand roughly 6m (18 feet) high.

The stage was built over two weekends, and tilted up into position as the last part of the construction sequence. The whole structure is anchored with a series of stakes below the deck of the stage, square lashed to the base structure.

More to follow tomorrow on the rafts and campsites...

April 27, 2012

Suspended flagpole

Today is Freedom Day in South Africa, a commemoration of our first inclusive elections in 1994. Here's a classic flag pole flying the South African Flag, which flew for the first time 18 years ago today.

This 3m (10 foot) lath flag pole is suspended from four stakes (we use 20mm steel stakes, but you can use wooden stakes if your soil is soft). A jury masthead supports the base of the flagpole and is attached to the four stakes with the lower guy lines. The top guys are tied on the the pole with rolling hitches, and looped to the stakes with trucker's hitches so that they can be adjusted and tensioned.

The key to making this flagpole work is accuracy: all of the stakes should be leaning out at the same angle, in a perfect square, and the jury masthead should be at the dead centre between them. The top guys should be tightened in opposite pairs if possible (this takes two people).

Check out this set on Flickr for a step-by-step guide to building an even bigger suspended flagpole.

March 23, 2012

A Kitchen Sideboard

From THE SCOUT annual, August 19 1948 - page 27:
This novel "Kitchen Sideboard" was erected by the 37th Dumfriesshire (Methodist) Troop at their permanent camp site, but is not a permanent gadget. It can easily be made and used by any Troop, as it unpacks for transport. The boxes, which are tea-chests, can be used as packing cases, and be set up on a suitable framework and at a suitable height for use as a table-top. Shelves are fitted to slip in and out for packing, and the doors are hinged, which enables them to be used as lids.
The hinges are better fixed with machine screws, as wood screws proved useless in this case. Metal angle-plates were fitted to the corners of the boxes at the door-opening to provide strength, and both boxes were given a couple of coats of good paint.
With regard to the rest of theconstruction, I think the photograph speaks for itself - the main corner posts are embedded eight or nine inches, two supports are lashed back and front to support the boxes, and one top rail at each end. The back posts are madea suitable height to allow for the plate rack, and a couple of straining posts are set at an angle at the back, embedded and lashed to the main posts. These strainers may be used as brackets to support the overhang of the plate rack. The mug rack is made simply by lashing forked twigs at intervals. The whole framework should be made up to be a fairly tight fit for the boxes.   - A.J. Dawson

March 2, 2012

Pioneered Scout Exhibition Stand

Copyright Gavin Penkin
This exhibition stand at the annual Hobby-X expo at the Coca-Cola dome in Johannesburg was built by a team of Scouts and Rovers to promote Scouting in the province of Gauteng.  More about the stand from Gavin Penkin, the Assistant Provincial Commissioner for Marketing in Gauteng Scouts:
"After some rapid planning and assistance of many Scouts, Scouters and Rovers, we built a stand at the Hobby-X expo at the dome yesterday afternoon. The organisers made us remove the hessian as they say it is very flammable. We replaced it with canvas from the sides of army tents. ... The Scout stand is the highest in the expo, and of you come and visit the expo, just look up and you will see the stand. The white screen is showing Scout pictures all day and is visible down the main passage for about 100m. "
Copyright Gavin Penkin

Copyright Gavin Penkin
If you're in Gauteng, please try and make your way to the Dome in Northgate over the weekend (the expo closes on the 4th of March) to take a look and support the stand. For those who are a bit further away, this is a great widea for promoting Scouting, using a pioneered exhibit, and aimed at outdoors and handcrafts oriented visitors.

September 26, 2011

Scoutmaster podcast #86: Kontiki and World Jamboree interview


Clarke Green from Pennsylvania runs a fantastic resource for adult leaders at Scoutmastercg.com. I recently spoke to him about my trip to the World Jamboree, as well as Scouting here in South Africa, concentrating on Kontiki. You can listen to the podcast, which is out today and available here.

Here are links to some of the things discussed on the podcast:

South Africa:  9th Benoni is my home group. Phoenix Rover Crew has a website here. Here is the blog of Joy Hutchinson, our Cub Pack's Akela. This is the South African Scout Association website (and Twitter account) with a special section on South Africa's contribution to world Scouting.


Kontiki: this is my raft category at Ropes and Poles, and this is the official Gauteng Kontiki website (here is the Western Cape one).


22nd World Scout Jamboree in Sweden: here is the official site. I kept a blog for the Drakensberg troop here, and the South African Contingent Management Team had a blog here.

Finally, if you're a new visitor to this site, welcome, and you can subscribe for email updates here, or to the RSS feed here. Likewise, if Clarke's blog is new to you, you can subscribe to email digests here, the podcast here, and the RSS feed here.

September 15, 2011

22nd World Scout Jamboree - Pioneering report back

Main gateway at the 22nd World Scout Jamboree, Rinkaby, Sweden
As mentioned in the last post, I recently returned from the 22nd World Scout Jamboree in Rinkaby, Sweden. I was travelling as the Troop Scouter of Drakensberg troop, in the South African contingent. I had a fantastic trip, and in between looking after my troop (made up of Scouts from all around South Africa), trading badges, and meeting new Scouts from around the world, I got some time to take a few photos of pioneering projects.

The main gateway was an impressive structure, and shines out because of it's simplicity- a hypar gateway made with 15m long pole cut from the forest on site, and made using yellow and blue rope to pick out the shape of the Swedish flag. This is a great idea that would work for any of the Nordic cross flags, the St George's cross or the Cornish flag. Probably wouldn't work on our South African flag...

Many countries had food houses on the main square, with iconic structures from their home countries. The French food house had this Eiffel Tower gateway, the Dutch had a pioneered windmill, and the English food house was inside a castle!

Our troop camped in Autumn town, and at the centre of our town square was this pioneered Apple basket, representing the harvest in autumn.

A Finnish troop in our subcamp (facebook link) built this 6m high observation tower, which gave a great view of the surrounding campsites.

...and this 40m high tower gave a view of the entire campsite. It was built using four rooted trees as the corners, and had a scaffold staircase all the way up to the observation deck.

Most troops built simple campsites, because there were many places to explore, people to meet and activities to try out. This is my troop's campsite, with a simple gateway in the shape of Table Mountain, and two flagpoles.

A quick search on Google or Flickr will reveal thousands of photographs of the Jamboree, so there is plenty to explore. If you went to the Jamboree, I'd love to see your photographs, too.

October 3, 2008

Swingboat


8th Pretoria Saint Alban's built this Swingboat earlier this year at Gauteng Kontiki. Total construction time was around 4 hours, with a troop of approximately 20 (relatively young) scouts. The swing seat plank is suspended using a scaffold hitch. A complete list of equipment for a smaller version of this swing is available at the SA Scouting website (PDF).

September 27, 2008

Pioneered Millenium Dome


This beautifully drawn and well explained project is modelled after the Millenium Dome in London. The instructions explain the whole process of construction, including the procedure to make the net which supports the plastic sheeting forming the dome. The net alone requires some 1700 feet (625m) of rope, so this is not a small project, but looks well worth the effort.

This project comes from the UK-based Pioneering Made Easy website, which has many original and unusual projects (I'd be particularly impressed to see a troop build one of these)

June 1, 2007

Sliding Door Gateway


This gateway was designed by the Patrol Leader who designed the portcullis gateway featured as one of the first projects on this blog.

The theme for Kontiki this year was 007, and the gateway was intended to be the door to a James Bond-style villain's lair. The three panels are made from corrugated plastic sheeting stitched onto a pioneered framework. A pair of guide poles at the(the drawing on the left shows how the two guide poles are placed on either side of the upright column), and another pair of guide poles sits at the bottom, guide the central panel, which is the door. We had originally planned to use a castor discarded from a remote controlled model aeroplane but were unable to fasten the wheel to the frame properly. A steel bench with the legs folded away proved to be a good flat surface for the door to slide along.

To be able to slide smoothly, the door needed to have no pole butts projecting out the bottom. The designer eventually arrived at a very tidy solution to the problem: A 'bent' or '7' tent peg (these are standard tent pegs for guylines in South Africa) is used in the corner, and the two poles that meet are round lashed to the tentpeg with sisal. If you don't have this type of tent peg available, then a length of quarter inch (8mm) steel rebar with a right angle bent in it is a good substitute.

April 5, 2007

Download Camping Gadgets for SketchUp


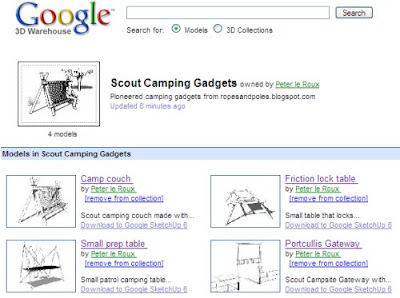
I have uploaded a collection of camping gadgets from posts on this blog (the couch,friction lock table, small kitchen table and portcullis gateway) to Google's 3d Warehouse service.

You can download SketchUp for free (for Windows or Mac) and then download the models from the Scout Camping Gadgets model collection.

March 2, 2007

Pioneered heated swimming pool


This is the kind of pioneering we don't see enough of : the Sherroes (senior Scouts) from Scouting de Veste Hasselt in the Netherlands built this heated swimming pool, with a series of photographs you can see here.

The supporting frame is made from poles, with corners notched log-cabin style. A seat is added, then the whole pool is lined with a waterproof tarpaulin. Water is carried to and from a fire by pipes which are insulated for most of their length.

(photographs courtesy Scouting de Veste Hasselt)

January 26, 2007

Hypar pavilion - inspired by Felix Candela


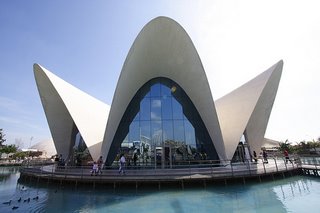
'Hypars' (hyperboloids) are a type of structure that have been used in pioneering since the 1960s. They are based on a type of lightweight engineering structure used to build in concrete. This six-sided structure is inspired by Felix Candela's Restaurant in Valencia (photo by festeban).

Although they look complicated, these structures have a secret that makes them a little easier to build- all of the strings used are pulled tight in straight lines. This means that you don't need to worry about how the curve gets formed- it is a natural result of tying all the straight lines.

This sequence demonstrates how to build one:
(1) lash the rectangular/diamond-shaped frame together, and prop 2 corners up with poles.
(2) run sisal from one pole to the opposite pole, starting at one end and working to the other end, making sure the lines do not cross each other. Start with a round turn and two half hitches and end with a clove hitch or constrictor.
(3) run a second set of lines between the other two poles. Once you have done this, you will be able to remove the props- but you will need guylines to hold the structure up. The sisal is actually holding the whole structure in shape. Because there are so many of them, none of them are under a lot of strain (which is why they are used to build in concrete- you can make the concrete VERY thin because the strain is spread out evenly).


If you take six of those units and attach them together you get the structure I have drawn here. This drawing shows the frames without the hypar lines.

What could it be used for? I'm open to suggestions- how about a chapel for a Scout's Own, a 'headquarters' tent at JOTI/JOTA or a café at a Jamboree? One word of caution: the 'saddle' in the centre, the lowest point of the curved surface, can often end up being VERY low. This is a place where a model can be used to figure out the right heights and angles before construction.

July 24, 2006

Large Gateway

I like to keep my eye on the scouting and boy scouts categories at SketchUp's 3d warehouse, and I picked up this gateway there today:

J. van Beijnen modelled it and says that it was based on a photo on the Dutch Scouting forum. Download the model here.
(see my tutorials to get up to speed on SketchUp)